
Advice and Tips for Growing Your Tomatoes
Tomato Varieties to Grow
The key to growing successful tomatoes is to find a sunny, sheltered spot and keep them regularly watered and fed.
When growing tomatoes, you need to choose a variety that will be suited to your location, the space you have available and of course, the flavours and textures you like.
Tomato varieties either grow as vines (cordon) or bushes.
Vine types (also known as indeterminate) are best suited to growing in greenhouses and polytunnels due to their large size and the care they require. Indeterminate varieties are the most popular. These tomato plants are grown with a single main stem and the side shoots need to be removed regularly. Popular tomato varieties include Sungold, Piccolo and Gardeners Delight. These tomato plants can grow to be several metres long and therefore they need to be supported. Our range of support frames in combination with our plant ties will be ideal.
Bush tomato types are also known as determinate tomatoes. These are more compact tending to stay bushy and quite short, so they're ideal for growing outside as they are very easy to support with a bamboo cane. Popular tomato varieties include Tumbling Tom, Red Alert and Garden Pearl. It is not necessary to remove the side shoots with these varieties.
Sowing Tomato Seeds
Tomato seeds require an optimum temperature of 18°C to 22°C (68°F to 75°F) and plenty of bright light.
When to sow your tomato seeds depends on where you plan to grow.
Here is a guideline:
• Heated propagator or heated greenhouse - sow January to early February
• Unheated propagator or unheated greenhouse - sow late February to early March
• Outdoors - sow late March to early April
How to sow Tomato seeds in pots.
Please refer to your seed packet instructions for sowing.
• Fill suitable 7.5cm (3in) plant pots with compost, lightly firm by tapping
• Scatter seeds thinly (most germinate so only sow a few more than you need) and cover with a thin layer of compost.
• Label using waterproof plant labels and put on a windowsill to germinate. Make sure they are not in direct sunlight, seedlings should appear within three weeks and be large enough to move into separate pots in about eight weeks.
• To do this, hold seedlings carefully by their leaves and gently lever them up with a Widger. Using a Dibber make a hole in a 30cm (12in) pot filled with compost and carefully lower in the seedling.
• Gently firm, making sure roots are covered and watered. It is ready to be moved into its final growing destination.
How to sow Tomato seeds in seed trays.
- Fill a seed tray with compost, and lightly firm it by tapping.
- Scatter seeds thinly (most germinate so only sow a few more than you need) and cover with a thin layer of compost.
- Label and put on a windowsill to germinate. Make sure they are not in direct sunlight.
- Seedlings should appear within three weeks and be large enough to move into separate pots in about eight weeks.
Once the seedlings are large enough to handle, prick them out into 3-inch pots (9-10cm). To do this, hold seedlings carefully by their leaves and gently lever them up with a Widger. Using a Dibber make a hole in a 7.5cm (3in) pot filled with compost and carefully lower in the seedling. Gently firm, making sure roots are covered and watered. It is ready to be planted into its final planting destination.
NB. If you are using a propagator, young tomato plants need to be gradually weaned off the heat of the propagator, this is called hardening-off. If you are going to plant your tomatoes outside you must not put them outdoors until all chance of frost has passed, or they must be moved to a 'halfway house' such as a cold frame or mini-greenhouse.
Growing your tomatoes on
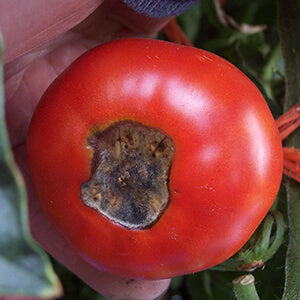
Tomatoes hate irregular watering - overwatering or sporadic watering can cause blossom end rot or cause the fruit to split - little and often is the rule here.
|
Blossom End Rot This photo is typically what you would see with blossom end rot. Basically the part of the fruit that had the flower - so the end furthest from the plant - is where the rot shows. It's not just tomatoes which can suffer from blossom end rot . . . also peppers and aubergines can also be affected. |
 |
Try to avoid watering in the evening. Tomatoes will use very little water or feed during the night. It’s always better to water in the mornings and early afternoon.
Feed your tomatoes with a general liquid fertiliser until they are established. Following that, use a high potash fertiliser to encourage your tomatoes to flower and fruit. Keep them weed-free and keep an eye out for the common pests.
Side-shooting
Bush tomato varieties do not require sideshooting and just tying to a cane should provide enough support.
Cordon tomato varieties do need their side shoots removed - this involves removing the new shoots that grow between the leaf and the stem. This ensures your tomato plant puts all its energy into growing its main stem until you remove the growing tip. Take care to remove the side shoots cleanly, without leaving any stubs or damage as this will encourage fungal diseases such as botrytis.
Tying-in
It is easier to manage cordon tomato varieties if you tie the plant up with string and twist the growing point around the string as the plant grows.
Pinching out the growing tip.
Usually,y the growing tip is pinched out when the plant reaches a required height dependent on greenhouse space and length of season). Don’t leave it too late in the year before removing the growing tip as there may not be enough time to ripen off the last fruit (unless you enjoy making chutney). Leave 2 leaves above the top flowering truss when removing the growing tip. This will ensure the last tomatoes grow to full size.
Taller plants will require some removal of the lower leaves, known as de-leafing, to encourage the ripening of fruit. Use a sharp knife to de-leaf flush with the stem,
again to reduce the risk of disease. Usually, remove leaves up to the lowest truss that has ripening tomatoes on.
Ripening
Once you've produced a healthy tomato plant the challenge is to minimise the proportion of tomatoes that need to be picked green.
Encourage tomatoes to develop as soon as possible to help the pollen spread by spraying the first flowers with a fine mist of water.
As flowers appear on indoor tomatoes, tap the trusses gently to encourage tomato fruit to develop.
On large-fruited varieties and beefsteak varieties, remove the end of 2 or 3 flowers from large trusses to encourage the remaining tomato fruit to grow to full size and ripen quicker.
With a little care, tomatoes can keep cropping until the end of October, at this time of year remove lower leaves up to the lowest fruit truss and as the weather cools water sparingly, to ensure compost doesn't get cold and wet, but make sure it does not dry out completely, or fruits can end up with thick skins which may split when watering is resumed.
Pests and Diseases
Tomato blight is your main concern as it will directly affect the fruit. It is mostly a problem with outdoor tomatoes. Leaf edges become brown and the fruits develop with blackened patches. You will need to remove and burn any affected areas as soon as you spot them. Unfortunately, there is no organic treatment for blight, but newer varieties (Ferline for example) have some tolerance.
Botrytis is also a problem on tomato plants particularly in a humid environment. Remove any old plant material from around your plants to improve air circulation. Stem botrytis can be sprayed with lemon juice or vinegar to help prevent it from spreading.
Watch out for slugs and remove any that you find near your plants.
If growing tomatoes in a greenhouse or polytunnel, you’ll need to check plants for aphids, whitefly and red spider mites. A damp greenhouse will keep red spider mites under control as will washing your plants down with soapy water. Plant some French marigolds nearby to deter whiteflies. Introducing predatory insects to a greenhouse can also help to control pests but this has little use if growing outside.
Did you know?
Plants that receive the perfect balance of water and nutrients are healthier and stronger, helping them to also have a greater resistance to pests and diseases.
Most problems occur when plants receive too much water or too little so knowing how much to provide usually involves a little guesswork and green fingers.
If you would like to grow tomatoes more successfully then our range of specialist products will be a great help, please view the following -
Quadgrow Self-watering Planter
Plant Halos
Vegetable Greenhouse
Harvesting
Harvesting can begin from mid-May and continue through October depending on where they're grown (when using systems in a greenhouse you could even still be picking in December).
Pick the tomatoes as and when they ripen. Always pick the tomato with the calyx (green stalk) still attached to the tomato. There is always a knuckle between the calyx and the truss which allows you to pick the tomato easily. Leaving the calyx on the tomato will keep it fresher for longer.
A ripening cover considerably speeds up ripening, reducing the proportion of tomatoes that will need to be picked green as the first frost approaches. Green tomatoes can be picked and left to ripen in a sunny spot. Place them in a paper bag with a couple of ripe bananas or apples to help the green tomatoes ripen.