
There are lots of greenhouse heaters on the market, so if you are thinking about buying a greenhouse heater, there are basically three main questions to consider before you do:
• Why ? why do you want to heat your greenhouse
• What ? what is the best outcome by adding a heater to your greenhouse
• How ? how do you go about heating your greenhouse.
Our aim here is to help you to answer these three questions quickly, easily, and efficiently and as a result help you make the best use of your greenhouse all year round and the best use of your available funds.
Why ?
If you live in the UK, like to garden and have a greenhouse, then you are going to be heavily affected by the changing weather conditions throughout the year. Changes in temperature, light and moisture will all affect what you can grow and when you can grow it.

I imagine you’re reading this as you want to be able to grow something in your greenhouse when the natural temperature would not be sufficient for healthy growth ?
It could be that you are overwintering more temperature sensitive plants, or that you want to start to grow plants earlier in the year, or for longer or out of season.
If this is the case then you need to be looking at greenhouse heaters and methods which you can use to ensure that any heat which is produced is retained within your greenhouse. But first and foremost, you need to understand what temperature you wish to achieve within your greenhouse – when you know this you can then decide what needs to be done to reach that temperature.
What ?
The temperature you wish to achieve in your greenhouse will depend what you want to grow. For example, in the colder months, if you just want to provide frost protection for plants which would normally be outside, then you may be able to achieve this by simply insulating your greenhouse. However, if you want to start off propagating earlier to get a head start on the growing year, then take a look at the seed packets and see what the germination temperature needed for healthy growth.
Once you know what temperature you want to achieve, it’s a case of seeing what your starting point is – so basically the current temperature within your greenhouse. You can determine this with the use of a thermometer.
How ?
Greenhouse heaters can be classified in lots of ways, but one of the most basic is the fuel type – do you have access to electric or gas or will you need to use bottled gas or paraffin. Let this guide you as the type of heaters to look at.


Below we will show you the advantages and disadvantages of the different fuel types and heaters which are available in each category.
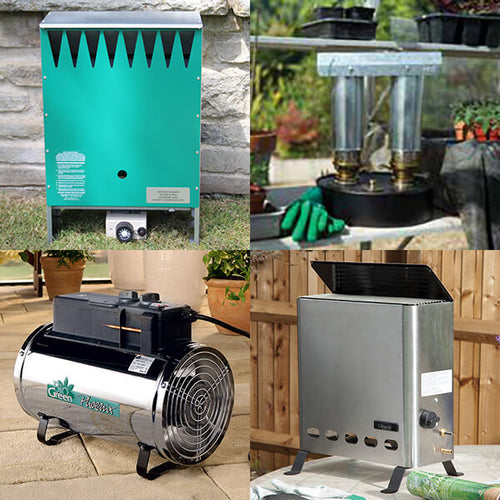
Paraffin Heaters
The most basic methods of heating a greenhouse, we only recommend using a paraffin heater when your greenhouse is in a remote location where there is no access to a power point – such as at your allotment. However, there are a few factors to consider before investing in this traditional type of greenhouse heater:
Basic heat control - controlling the heat output on a paraffin heater is very basic. There is no thermostat with a paraffin heater and the only way for you to control the heat output with a paraffin heater is to check that the wick is burning correctly – don’t be tempted to think having a longer wick will produce more heat as this will only cause problems and result in black smoke and soot forming.
Only suitable for small spaces - paraffin heaters are only available in small sizes so only suitable for smaller greenhouses or for keeping areas frost free. Their small size and lightweight structure also makes them a potential fire hazard if knocked over, so always position safely within your greenhouse, with a minimum of 30cm distance from any flammable materials.
|
|
Tiny Paraffin Heater The average heat output is 150 watts, whilst it's tank will hold up to 1.7 litres / 3 pints of paraffin. If left on all the time you could expect this heater to burn for approx. 10 days before needing to be refilled.
|

Sometimes called an ‘anti-frost heater’ this Tiny heater can keep areas up to 2sqm frost free. Its solid construction also makes it a long-lasting, cost effective unit.

Really easy to operate, this Tiny heater has a robust metal tank with removable burner in the centre for easy filling.
An adjusting wheel allows you to adjust the height of the wick – it’s recommended that the top of the wick is only just above the burner, with the rest inserted into the tank.
Viewing windows around the top of the heater let you easily see that the wick is burning correctly, whilst the flame proof gauze chimney directs the heat upwards.
Needs care and attention – with a limited capacity, you will need to keep refilling the tank of your paraffin heater. You always need to extinguish the flame before adding more paraffin. To do this turn the wick / wicks down fully and blow out the flame. Remove any excess soot from the wick with a soft brush or cloth. Top up the tank with paraffin and then refit the burner unit, adjust the wick and re-light.
Is paraffin cost effective? - although paraffin heaters used to be considered a cheap way to heat your greenhouse, costs have altered significantly over the past years. On average paraffin costs about £13.50 for 4 litres – if you compare this to the capacity of a paraffin heater, the Mini Heater has a capacity of 4.5 litres with three and half days burning.
|
Mini Paraffin Heater It's 4.5 litre tank will produce an average heat output of approx. 300 watts. If left on all the time you could expect this heater to burn for approx. 3½ days before needing to be refilled. |
 |
Another robust paraffin heater from the same manufacturers of the Tiny heater, this Mini heater has a metal tank, galvanised chimney and dependable brass components.

A screw threaded lid for where the paraffin is poured into the tank, together with a screw threaded burner helps to make a secure, safe unit.
A wide heat spreader screwed to the top of the single chimney ensures heat is distributed evenly. Whilst a single viewing window lets you monitor that the wick is burning correctly whilst adjustment screws let you alter the height of the wick if required.
Ventilation required - burning paraffin produces moisture so it’s important that there is adequate ventilation when using a paraffin heater to allow the moisture to dissipate. Unfortunately this also means that some of the heat generated will be lost because of the ventilation needed.
Paraffin heaters are not suitable for all plants – it’s important to note that not all plants can tolerate the raised CO2 levels and fumes associated with using a paraffin heater in your greenhouse including carbon monoxide, nitrogen oxides and sulphur dioxide. This means that paraffin heaters should not be used in greenhouses where orchids or cactus are being cultivated.
If you don’t want the hassle of having to refill a paraffin heater but don’t have access to electricity, then your next option is to consider a gas heater.
Gas Heaters
Gas heaters can be split into two basic types:
- Natural Gas
- Propane Gas.
Natural Gas Heaters
Using a natural gas heater takes away the need for having to buy paraffin or bottled gas to keep the heater running but does rely on you having a gas supply to your greenhouse.
If you have natural gas available in your greenhouse, then these types of heaters are an excellent choice as natural gas burns cleanly, there is no need to store fuel and there is very little maintenance required.
Compared to other forms of heating for your greenhouse, natural gas is also relatively economical – to confirm the cost simply check your bill to see how much you will be charged. Although prices are constantly changing, currently (October 2022) the average energy price per kWh is 10.3p (inc. vat) with a standard variable tariff. But you should check the price you pay as it can be affected by where you live, what kind of energy plan you are on, what payment method you use and what time of day the energy if being consumed.
kWh is an abbreviation for kilowatt-hour and is the name given to a unit of energy. One unit refers to the use of 1Kw / 1000 watts over one hour.
|
Hotbox Natural Gas Heater Their generous heat output makes them suitable for most sizes of domestic greenhouse whilst their thermostatic control helps to make them efficient to operate. Easy to use the thermostat turns the heater down to just a pilot flame when the desired temperature is achieved, so no fuel is wasted. |
 |
Installing A Natural Gas Heater
When installing a natural gas heater you must always employ a Corgi registered engineer as the ‘Gas Safety (installation and use) (Amendment) Regulations 1990’ states that all gas appliances must be installed by a competent gas engineer approved by the Health and Safety Executive.

Positioning A Natural Gas Heater
The Hotbox Natural Gas Heaters which we stock are convector heaters that rely on collecting the coolest air, heating it and expelling it at speed (up to 300cfm on max). They have been designed to give a moderate increase in temperature to a large volume of air rather than a higher increase to small quantities.
When positioning the heater in your greenhouse it should be a minimum of 6inch (15cm) away from the glass or frame of the greenhouse or any combustible material. Ideally place in the centre of the area to be heated, with the sides of the heater positioned to the sides of the greenhouse as this will allow the warm air to circulate more easily within your greenhouse.
The manufacturers also recommend that the heater is fixed in position through the holes in the base of the heater, onto the floor of the greenhouse (so a slab or concrete base).
Ensuring Adequate Ventilation
The burner within the Hotbox Natural Gas heaters has been especially designed for use in a greenhouse and will not produce gases which would be harmful to your plants.
However, unwanted gases can be produced by the heater if there is unburnt or partly burnt gas. Natural gas heaters need a continuous supply of oxygen to ensure that all the gas is completely burnt when they are being used so you need to make sure there is adequate ventilation within your greenhouse so oxygen can easily reach the burner. All you need to do is check that you have a minimum of 24 sq. inch or 140 sq cm of ventilation – this could be an opening roof vent which are normally 2ft square or a louvre window or a combination of both. You might think that adding a heater means you should keep all the windows shut – this isn’t the case if you want a gas heater to function effectively.
Adding additional ventilation to an existing greenhouse is not always easy. However, this Louvre Kit has been designed to do just that.
Simply keeping a louvre window open of this type in an average 6ft x 8ft domestic greenhouse should provide sufficient ventilation for your gas heater to operate effectively.
Efficient Thermostatic Control
Using a heater with a built-in thermostat means that you are able to automatically control turning the heater on and off based on the temperature within your greenhouse. With a gas heater this basically means that when the set temperature is reached the thermostat will turn the heater down to a pilot light until the temperature drops when the flame will be restored to produce heat.
These Hotbox natural gas heaters feature a ‘liquid expansion’ type of thermostat. This means that the sensor is full of liquid which expands when the temperature rises. The expanding liquid runs along the capillary tube into a piston like unit, which moves and reduces or shuts off the fuel supply. When the temperature falls the opposite occurs.
When you receive your natural gas heater you will find the temperature sensor tucked away inside the base of the heater casing.
|
It is important that you uncoil the wire of the sensor and move the sensor to a temperature critical area within your greenhouse so you are measuring the temperature where it is most important – for example you could position the sensor on the surface of one of your benches where your plants are growing. The flexible cable connected to the sensor enables you to position it up to 2ft / 61cm away from the heater. |
 |
Setting The Required Temperature
You will find on many greenhouse heaters, including these natural gas heaters, that the control knob on the heater to turn to achieve higher temperatures does not feature the temperature in degrees Celsius or Fahrenheit, rather it is simply numbered 1, 2, 3 etc, with the higher number indicating the higher temperature.
This means that when using a greenhouse heater for the first time in the year you will need to use a thermometer to monitor the temperature in your greenhouse to ensure the heater is set correctly to achieve the desired temperature.
|
|
If the temperature falls below 5 degrees the thermostat will turn the heater back on and when it reaches 5 degrees it will turn it off again. |

You should then check that the heater is working correctly by re-visiting your greenhouse throughout the day and check that only the temperature you wish to achieve is being reached.
It should also be noted, that as the season changes and temperatures reduce outside, to maintain the same temperature within your greenhouse could mean that the heater will need the control knob turning to a higher setting to maintain the temperature you require.
Propane Gas Heaters
Propane Gas makes a good fuel for a greenhouse heater as it is easy and convenient.
|
It is available to purchase in large bottles / cylinders, such as 13kg, 19kg, 47kg, which are red in colour. We recommend for a greenhouse heater to use a 19kg gas cylinder or larger, ideally keeping a spare on hand so that you do not run out of gas. Or using two cylinders linked together using an automatic changeover valve. |
 |
If you are using one of the larger propane gas heaters, like a 6kw heater, then you might want to use a larger 46kg cylinder - just be aware that at this size the cylinder is unwieldy.
You can calculate how long your gas cylinder should last using this quick calculation:
Assuming a standard propane gas at 37 mBar
For 1kw of heat you would use 0.074kg of gas per hour
So a 3kw heater uses 3 x 0.074kg you would use 0.222kg/hr (3 x 0.074) of propane gas.
Assuming that your heater was on high and for 8 hours a day, you would use 1.776kg/day (8 x 0.222)
Based on this a 19kg bottle would last for 10.6 days (19 divided by 1.776).
This sounds like a lot of gas being used but will be an over estimate as your heater is thermostatically controlled so is unlikely to be on for 8 full hours a day. So, the 19kg bottle would probably last twice as long, so about 20 days or 3 weeks. However, since every greenhouse and grower is different, with different plants etc. then this is only a rough calculation.
On the top of the bottle / cylinder of propane gas is a threaded fitting. To connect this to your heater you will need a pressure regulator fixed to 37 mbar and sufficient gas hose to fit between the cylinder and the connector on the heater. You will also need two jubilee clips to ensure tight connections. .
|
|
Propane Gas Regulator The regulator reduces the high pressure gas from the propane gas cylinder to the much lower gas pressure of 37 mbar that the gas heater needs to operate. Click here to see full details.
|

It is important that your pressure regulator works accurately. It will have been precisely set by the manufacturer to control the pressure of the supply and must not be adjusted. You should check your regulator for any damage or wear and tear and it should be replaced at a minimum every 10 years.
|
Hose for Propane Gas Heaters It is an 8mm flexible, rubber hose with a maximum working pressure of 37 mbar. This high pressure hose can be purchased per metre, up to a maximum length of 3 metres. |
 |
The length of the hose should not be over 3 metres as over that length with low pressure regulators you would get a drop in pressure so the appliance wouldn’t work correctly. So ideally keep your hose as short as possible – a longer hose just increases the chance for more leaks.
You should inspect your gas hose regularly for signs of cracking or general wear and tear and replace if necessary. The manufacturers also recommend that your rubber gas hose is replaced at a minimum every 5 years.
|
|
Jubilee Clips For Gas Hose The screw on the side of the clip makes it easy for you to both loosen and tighten the clip to make securing as straight forward as possible. Click here to see full details.
|

As with other types of greenhouse heaters, when it comes to a propane gas heaters it’s all about safety, having the correct heater installed in the correct way. These gas heaters are not difficult to install as most the safety considerations are common sense, including:
- Use only in a well-ventilated area – your greenhouse must have some free-flowing ventilation in both the top and bottom parts of your greenhouse. So this is usually a combination of an opening roof window and a side louvre window.
- Do not position the heater close to walls or flammable materials which could create a fire risk. We recommend that your greenhouse heater is at least 4 inch / 10cm from any walls and have a clearance of 16 inch / 40cm from overhead surfaces.
- Only use with a fixed pressure regulator – the output pressure of the regulator must match the pressure required for the heater. In the case of the heaters we sell this is 37 mBar.
- Only use with propane gas – we are often asked if other types of gas can be used with these heaters. They cannot. It would be both unsafe and would not work correctly, if at all.
- Only use with high pressure rubber gas hose – this hose should not be bent or twisted and should not come into contact with the heated parts of the unit.
And it’s also important to note that these heaters are sold for use in a greenhouse – they are not for domestic use and should not be used as a room heater due to their need to be in a well-ventilated area.
All our gas heaters are supplied with comprehensive instructions from the manufacturers so as long as you read these before installation and follow their advice your heater will work efficiently and safely.
Electric Heaters
The most popular type of heater to use in a greenhouse is an electric heater. This is because they are easy to install - simple to use - and should never run out of fuel - unless there is a power cut! However, using an electric heater within your greenhouse does mean that you need access to electricity within your greenhouse. If this already exists then we highly recommend that you use this type of heater. If you haven't, current regulations require that a qualified electrician is required to set up a supply within your greenhouse and is likely to require armoured cables underground.
The cost of running an electric heater might make it appear a costly way to provide heat within your greenhouse. Currently (October 2022) the government have put a cap on kWh at 34p for electricity, compared to 10.9p for natural gas. However, some of the initial cost saving seen using a gas heater is offset by both the ventilation required when running one and the initial cost of having natural gas installed. Electric is a clean fuel, doesn't emit water, soot or carbon monoxide, all of which can adversely affect your plants and makes some of the other fuel options unsuitable for certain types of plants. Plus, the safety, ease and convenience of using an electric heater still makes it the most popular choice amongst gardeners.
Electric heaters can be divided into two types:
- Electric Tubular Heaters
- Electric Fan Heaters.
Electric Tubular Heaters
When adding heat to your greenhouse you have to be aware of the hazards of heaters operating in damp conditions. This becomes even more important when you have misting systems or spray systems set up in your greenhouse which will be on and working at the same time as your heater. Both types of Tubular Heaters which we stock are IP rated high enough to be able to be used in these conditions.
Did You Know ?
An IP Rating is a two-digit number that provides an ‘ingress protection’ rating to determine the protection an item has from external elements, such as water or dirt. The first digit is the ranking for solid protection from 0 to 6. The second digit is for liquid protection from 0 to 9. 0 represents no protection.
|
Slimline Eco Heaters Their rating also indicates that they are protected from solid particles that are over 1mm in size, so soil or compost would not be a problem. Whilst their clean enamel finish means they are easy to wipe clean. |
 |
|
|
Electric Tubular Heaters With an output of 60w per foot they have been designed to be left on constantly. However they can be plugged into a thermostat if you want to turn them on and off automatically. Click here to see full details.
|

Compared to other electric heaters, tubular heaters are economical to run due to their very low wattage. The Electric Tubular Heaters at 60 watt per foot can cost as little as 2p per hour depending on your tariff (October 2020).
However, what you need to consider is that with a low wattage heater you have less heating power. This means that if you are using them in your greenhouse, which could be 6ft x 8ft, then you could need several heaters in your greenhouse just to keep it frost free.
Electric Fan Heaters
One of the main advantages of using an electric fan heater is that the fan ensures good distribution of the heat it generates throughout the whole of your greenhouse. So you should have more equal temperatures throughout the whole area rather than having hot spots near the heater and cold spots in the corners.
Top Tip
With many fan heaters you will find that they have a fan only setting, which means that these heaters can be used in the summer to circulate air around your greenhouse. So although they won’t generate cold air, they will act just like your office fan, helping to move the air around and if placed near the door, louvre window or roof vents they will help to pull fresh air into the greenhouse.
All the models which we sell which include a fan only setting.
|
|
This very quiet, evenly working fan using an economical 30 watts of power when on the fan only setting yet still manages to circulate an astonishing 460 cubic metres of air per hour. |

So when we speak to gardeners who are concerned about using a heater where the fan runs all the time, it’s important to look at how few watts are actually used when the heater is only circulating the air. And, by continuously circulating the air, you are ensuring that no pockets of stagnant air should form which can harbour bacteria which could cause diseases, affecting the health of your plants.
|
With the Phoenix heater you can hang this from the ridge of your greenhouse - this is not only convenient if you have a very busy greenhouse, research has shown that heat distribution is better when the heater is hung rather than being free standing. Included with a Phoenix heater are two sturdy metal hanging chains, each approx. 21 inch / 53cm long. |
 |
|
|
These fastening brackets are suitable for use in an aluminium greenhouse as they have a cropped bolt which slides into the glazing channel on the aluminium frame. |

The same is also true of the Hotbox Fan Heaters, which can be used either free standing or hung from the ridge of your greenhouse.
|
With the Hotbox heaters you receive two 12 inch / 30cm metal chains, with one S hook for each chain. The S hook is used to fit through the pre formed hole in the casing of the heater and then connect to the chain. At the opposite end of the chain it is left for you to decide how to attach it to your greenhouse. |
 |
If attaching to an aluminium greenhouse the easiest option would be to attach Fixing Supports to the frame of your greenhouse and S Hooks to connect the chain to the Fixing Support (these would have to be purchased separately).
Positioning Your Fan Heater
Unlike the Phoenix and Hotbox Fan heaters mentioned above, that can be hung in the greenhouse or used free standing, all the other models of electric fan heater which we stock have been designed to be only used free standing.
When positioning a fan heater make sure that it is stood on a firm surface – that could be on the greenhouse floor if it’s concrete or slabs – or on your greenhouse benching. It should have a minimum of 12 inch / 30cm of free space around the back and sides and 24 inch / 60cm free space in front where the warm air is expelled.
An electric heater should never be positioned immediately below a socket outlet – the reason for this is that the socket could be damaged by heat from rising hot air, as their casings or inside parts are often made of plastic.
Selecting The Power Setting
To ensure maximum versatility and economy, all of the electric greenhouse fan heaters we stock have a power setting on them, which is why you will see two control knobs on the heaters.
|
|
2KW Greenhouse Heater
|

This means that if you are using the heater in a smaller greenhouse you could set it on the 1KW setting, for larger greenhouses the 2KW setting.
Whilst a very similar control knob is featured on our most sophisticated greenhouse heaters.
|
Hotbox Fan Heaters
|
|

Setting The Temperature
All of our electric fan heaters are thermostatically controlled, which basically means that you are able to set them to heat your greenhouse until it is to the temperature you require, then turn off. Then automatically turn on again when the temperature falls. This type of control is one of the reasons why electric greenhouse heaters are so popular – you don’t waste money and potentially overheat your greenhouse as they automatically turn on and off to maintain the temperature you have set.
To enable you to set a temperature almost all our electric fan heaters feature a graduated dial. This is a dial which you can turn to move the temperature from low through to high and does not show the temperature in degrees Celsius or Fahrenheit. Here are a few examples:
|
|
Bio Green Tropic For example, if you only wanted it to keep your greenhouse frost free then you would turn the dial to the min position. |

We recommend for a frost stat setting to aim for 5 degrees Celsius, so you now need to monitor the temperature in your greenhouse using a thermometer.
After allowing the heater to run for a while check the temperature – if it’s still below 5 degrees then adjust the dial upwards. If its over 5 degrees then adjust the dial down slightly. Repeat this process until 5 degrees is achieved.
Your heater is now set to automatically turn on and off to maintain the set temperature.
|
Bio Green Phoenix With this heater the thermostat is linear and infinitely variable from 0-26 degrees Celsius. The printed figures from 0-10 on the dial take you from 0-26 degrees in temperature increments of approx. 2.6 degrees Celsius. |
|

For example,
- 0-1 = 0 - 2.6 degrees Celsius
- 1-2 = 2.6 - 5.2 degrees Celsius
- 2-3 = 5.2 – 7.8 degrees Celsius
- 3-4 = 7.8 – 10.4 degrees Celsius.
The manufacturers still recommend, even with this type of thermostat dial, to use a max-min thermometer to monitor the temperature in your greenhouse and adjust the dial as with the Tropic heater.
|
|
Hotbox Fan Heaters This makes these heaters the simplest to set - although to ensure any heater is working correctly we always recommend using a max-min thermometer in your greenhouse so you can monitor the temperatures being reached. |
